 Learn six very easy ways to use technology as a teaching tool
There are many everyday tools out there that can help you achieve specific educational goals in your teaching. But first, let me emphasize that technology should be used in service of teaching and learning. Therefore, I am presenting several scenarios where technologies could help an instructor become more in tune with students and their needs.
Scenario #1: Learn more about your students’ prior knowledge and preconceptions before class.
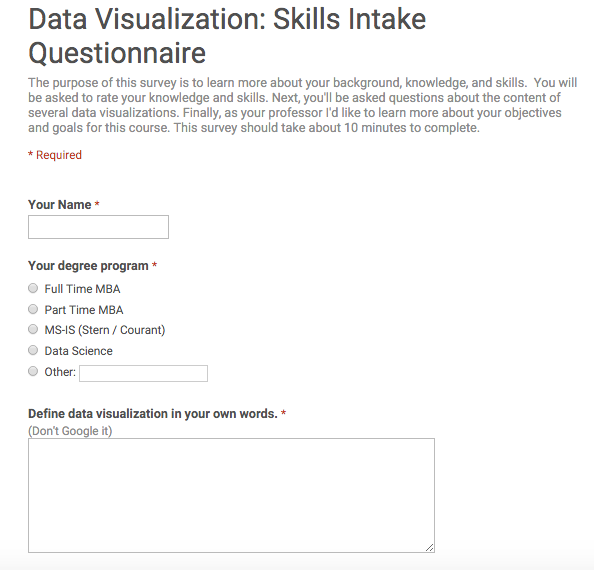
Why would you want to know what your students already know? Students have diverse experiences and knowledge. In fact you may be surprised what they already know about your course content and equally surprised by what they don’t know. One way to learn more about what they know and what they don’t is to ask them in a simple pre-course survey.
You can build a course survey using any number of survey tools. I prefer GoogleForms, SurveyMonkey, or Qualtrics.
Figure 1. A student survey created in Google Forms
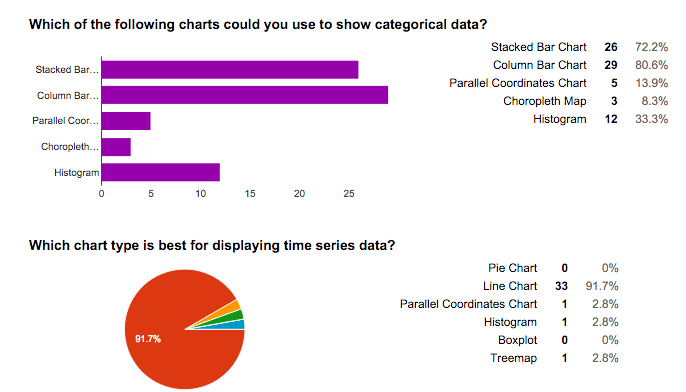
After students complete the survey, the instructor can see the data presented in spreadsheet-form or in summary form. The summary page from Google Forms is shown in Figure 2. In my courses, I show the summary page in class for students to reflect on their own responses in relation to their classmates. In the survey I ask a few types of questions: 1) Perception questions: For example, “how confident are you in using the following technologies: Python, R, PowerPoint, and Excel? 2) Content questions: For example, “which of the following data visualization chart types is most appropriate to show time series data: pie, line, histogram, or scatterplot?” and 3) Open ended questions: For example, “Define data visualization.” Open-ended questions allow students to share their understandings of the content in their own words.
Figure 2. The results of a student survey in Google Forms
In my courses, I show the summary page in class to students for them to see where they rank in relation to the entire class. In the survey I ask a few types of questions: 1) Perception questions such as how confident are you in using the following technologies. 2) Content questions such as which of the following data visualization chart types is most appropriate to show time series data: pie, line, histogram, or scatterplot? 3) Open ended questions such as define data visualization. Open-ended questions allow students to share their understandings of the content in their own words.
Scenario #2: Present ideas or concepts in diverse ways using open content
When introducing a new topic or concept, it may be helpful to provide students with multiple explanations from varied perspectives. For example, when introducing students to the topic of data visualization, I share with them the voices of data scientists, artists, and information designers. Each voice adds a new view of data visualization and the benefits of the medium.
There are plenty of open resources available on the web. For my data visualization course, I like to show TED Talks from David McCandless, who is a data journalist, and Aaron Koblin, who is a data artist. This adds diversity to course that is intended for business analytics students and MBAs. The reason I choose to show videos instead of a guest lecture is because the perspectives are important to recognize and acknowledge, but an entire class session is not needed to communicate and share these ideas. Instead a short three to five minute video from three or more experts works nicely.
In addition to using TED, the Khan Academy has a great set of resources for math, computing, the arts, and much more. I use to Khan in my class as a resource for students to review statistical models such as regression or constructing scatter plot. See the example below.
Constructing a scatter plot:
Scenario #3: Bring new perspectives into the classroom.
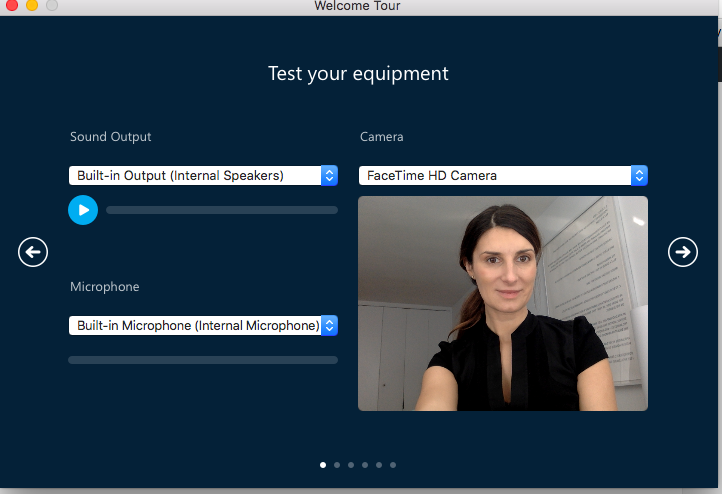
In professional education, it’s important for students to be exposed to professionals in the field and interact with them. By inviting professionals I can add diversity to the class discussion and dialogue. With tools like Skype, you can synchronously bring in guests from around the globe. Without the time and expense of travel, an expert can address a class from any location and respond to audience questions in real time. Learning becomes increasingly authentic as it expands beyond the walls of the classroom. Academic and field experts virtually present to students and colleagues.
Figure 3. Basic setup for a Skype guest speaker
When bringing in guests physically or virtually into the classroom, it’s critical to consider their roles, the roles of the student and the role of the professor. By defining the roles in advance you can select how best to use technology. For example, if the role of the guest speaker is to provide students with feedback on their work, advance preparations need to be made to share the work with the guest speaker and give them a framework for appropriately responding to the student work in the context of a classroom environment. Moreover, when using a tool such as Skype you want to ensure the speaker can see and hear the students and the students can see and hear the speaker.
Scenario #4: Mentor and coach students outside of the classroom
Each semester I require the students to schedule at least two meetings with me. I find that the one-on-one attention with students and student groups allows me to mentor and coach them. Given our busy schedules it’s difficult to find time. I find that it’s great to meet with them online using live meeting tools. It works better for our schedules and they come better prepared since I require them to give a five-minute status-update presentation using PowerPoint (they share their desktops with me). I prefer live meeting tools because they allow for visibility of all participants, unlike phone conferences. This gives each student an equal voice in the conversation and makes them accountable. The technology used to support live online meetings can range from free software such as Google Hangouts, WebEx, GoToMeeting, Join.me, and Adobe Connect. Many LMSs are equipped with their own live online meeting tools. It’s important to note that many of the free tools limit the number of users that can be online at the same time. The features of online live meeting tools include voice and video capabilities in addition to screen and document sharing.
See a short video we created at the W.R. Berkley Innovation Lab to demonstrate how to use GoToMeeting:
Scenario 5: Collaboration and group work
To facilitate collaboration between the instructor and student groups create a shared web-space. This will enable the instructor to provide feedback on student work and to monitor student progress. Google Docs enable faculty and students to collaborate more efficiently and effectively on papers, spreadsheets, and presentations. Google Docs, allow an instructor to see who contributed what sections, who made comments, and how an assignment came together. Google Docs, Presentations, and Spreadsheets allow for multi-user authoring and creation of content. It’s great for writing reports, drafting presentations, and managing projects. Several people can collaborate simultaneously, refer to Figure 3 to see the sharing capability of Google Docs.
Figure 4. Sharing settings in Google Docs.
There’s never a need to keep track of several versions of documents. The revision history features allows one to revert to previous versions of the document, if needed. This also encourages more accountability since each “collaborator” on the Google Doc can see exactly what they contributed. The auto-save feature ensures their work will never be lost.
Providing feedback on team projects
Using the comments feature, you can add feedback in-text or in the margin of the document. See Figure 5. This way, you can give feedback in your own timeframe and don’t have to worry about coordinating group meetings. You can also hold “online office hours” using the chat function if you wish to talk to students about their work.
Figure 5. Instructor comments on student-group work in a Google Shared doc.
Full class collaboration
Share a Google Doc with the whole class to coordinate group projects and presentation signups. Or, create a venue for interactive brainstorming. Encourage students to share their work with the class to allow others to see their ideas and get feedback.
The key advantages of using a shared solution such as Google are the following:
- Easy to share & collaborate
- Ability to set view and permission settings
- Ability to provide contextual comments & feedback
- Stay up to date
Scenario #6: Assess student application or understanding of concepts.
In addition to using open resources to extend your repertoire of examples, consider providing some opportunities for student to self-assess. This will allow students to gauge their knowledge and understanding of the content. Moreover, it will signal to the students some of the important concepts they should know and learn. There’s a myriad of ways to do this. In one of my previous posts, I explained how to use interactive video. For example, within a short video demonstration, instructors can embed questions into the timeline of the video that students can respond to and receive feedback on their responses. This approach also engages students in the course content in advance of class. Other ways to approach this is to use 1) textbook resources such as Pearson or McGraw Hill who provide chapter by chapter quizzes that accompany their textbooks 2) Use the quiz tool in your LMS to create short weekly self-assessment quiz 3) use student response systems in class.
These were just six ways for using technology in your classroom to help your teaching practice. You noticed that many of the approaches include instructor involvement in student work, not just implementing a quick technological fix.
Kristen Sosulski is an Associate Professor of Information Systems and Director of Education for the W.R. Berkley Innovation Lab at NYU Stern School of Business.


